Rescue & Recovery Techniques
8 tips in Contamination & Troubleshooting
By Andrew Langevin · Founder, Nature Lion Inc · Contributing author, Mushroomology (Brill, 2026)
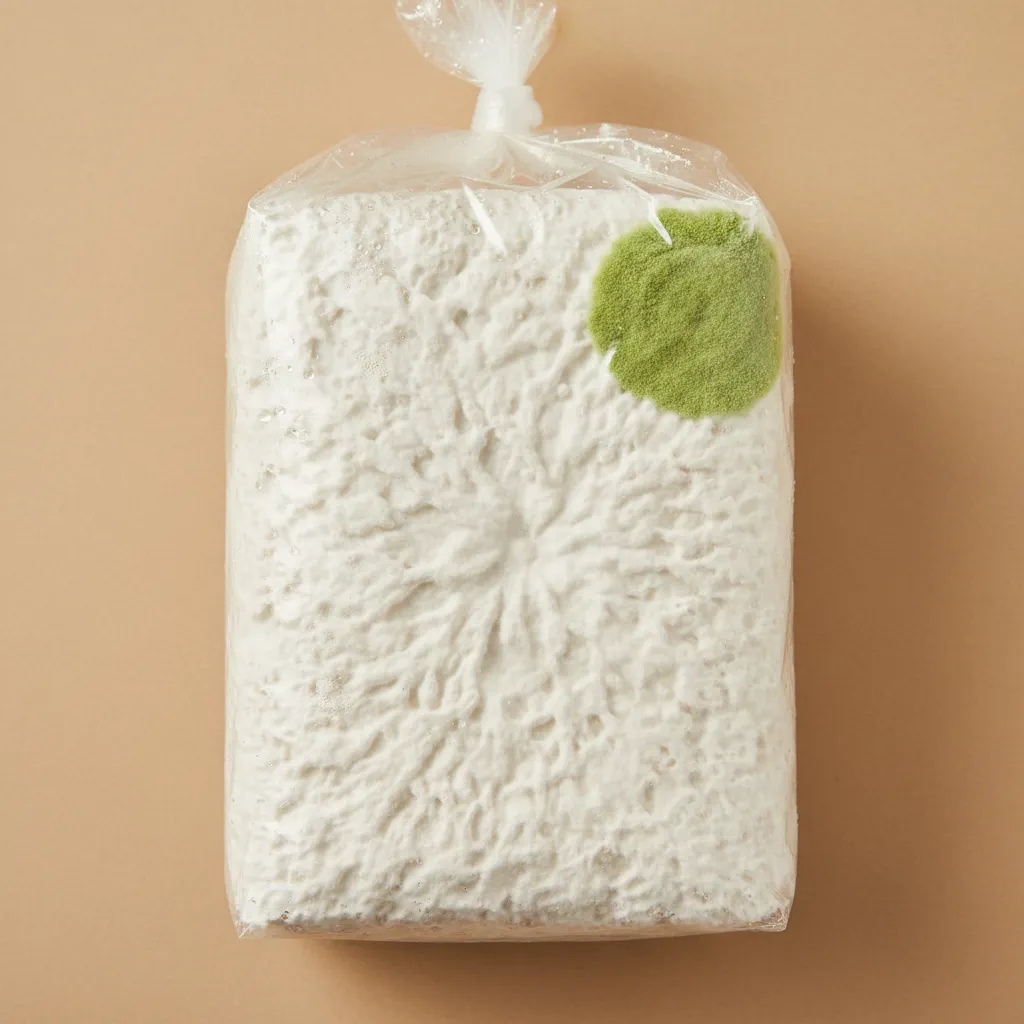
In rare cases, yes — but only if you catch Trichoderma in its earliest white stage before it turns green and sporulates. Once green spores are visible, the battle is lost and the tub should be sealed and removed immediately. Early-stage Trichoderma appears as a patch of unusually aggressive white mycelium that grows noticeably faster than your mushroom culture.
Rescue steps for very early detection:
- Isolate the tub immediately — Move it far from your other grows to prevent cross-contamination
- Remove the affected area — Using a clean spoon, scoop out the suspicious patch plus a two-inch margin of healthy-looking substrate around it and discard it sealed in a bag
- Apply salt or hydrogen peroxide — Pack non-iodized salt into the excavated area to create a hostile environment, or spray heavily with 3% hydrogen peroxide
- Increase fresh air exchange — Trichoderma thrives in stagnant, humid conditions
- Monitor obsessively — Check the area every twelve hours for the next three days
Realistically, success rates for Trichoderma rescue are low — around twenty to thirty percent. The mycelium has likely already spread beyond what you can see. Many experienced growers consider any Trichoderma sighting a lost cause and focus their energy on preventing it in future batches rather than attempting rescue.
Rescuing a contaminated agar culture is one of the most practical and commonly successful recovery techniques in mushroom cultivation. The process involves transferring a clean piece of your target mycelium away from the contamination onto a fresh agar plate, repeating until you achieve a pure culture.
The transfer process:
- Identify the cleanest area of your target mycelium on the contaminated plate, as far from the contaminant as possible
- Using a flame-sterilized scalpel, cut a small wedge from the leading edge of healthy mycelium — the outermost growing tips are least likely to carry contamination
- Transfer this wedge to the center of a fresh, sterile agar plate
- Seal with parafilm and incubate
- Repeat the transfer two to three times onto successive fresh plates, each time selecting from the cleanest growth
By the second or third transfer, most contaminants are left behind because your mushroom mycelium grows outward faster than the hitchhiking bacteria or mold at the leading edge.
This technique works best against bacterial contamination and slow-growing molds. Fast-spreading contaminants like Trichoderma are harder to outrun. Always work in a still air box or flow hood, and flame-sterilize your scalpel between every cut.
Never open contaminated containers indoors — seal them and remove them from your growing area immediately. The way you dispose of spent and contaminated substrate matters because careless handling can spread mold spores throughout your grow space and increase contamination rates in future batches.
Safe disposal options:
- Outdoor composting — Bury contaminated substrate at least six inches deep in a compost pile or garden bed far from your growing area. The soil ecosystem quickly breaks down the contaminants
- Municipal green waste — Bag the material sealed and place it in your yard waste bin if your municipality composts
- Trash disposal — Double-bag heavily contaminated material (especially Aspergillus) and place in regular trash
Special considerations:
- Lightly contaminated blocks that produced mushrooms before contamination appeared can sometimes produce outdoor flushes when buried in a shady garden bed
- Trichoderma-contaminated material should be composted far from your indoor growing operation — at least fifty feet away if possible
- Spent but uncontaminated substrate is excellent garden amendment and can be applied directly as mulch
Clean your containers thoroughly after emptying them. Soak in a ten percent bleach solution for thirty minutes, rinse, and dry completely before reuse. Residual spores on container walls are a common source of recurring contamination.
A thorough grow room cleaning after a contamination event is essential to prevent recurring problems. Mold spores are microscopic and settle on every surface — walls, shelves, floors, equipment, and even the ceiling. A surface wipe alone is not sufficient.
Complete grow room decontamination protocol:
- Remove everything — Take out all substrates, blocks, equipment, and supplies. Inspect each item individually before returning it
- Vacuum all surfaces with a HEPA-filtered vacuum to remove loose spores and debris
- Wash all hard surfaces with a ten percent bleach solution (one part bleach to nine parts water) and let it sit for ten minutes before wiping
- Follow with seventy percent isopropyl alcohol on equipment and work surfaces
- Launder or replace any fabric items like towels or curtains in the space
- Run an air purifier with a HEPA filter for twenty-four hours before reintroducing any substrates
Pay special attention to:
- Cracks and crevices where spores accumulate
- Humidifier reservoirs and tubing, which harbor bacteria and mold
- Fan blades and vent covers that circulate contaminated air
- The underside of shelves and behind equipment
After cleaning, start with a small test batch before loading the room fully. If the test batch colonizes cleanly, your decontamination was successful.
No — hydrogen peroxide is effective against some contaminants but not all. It is a useful tool in your contamination-fighting arsenal, but thinking of it as a universal solution will lead to disappointment and lost grows.
What three percent hydrogen peroxide works well against:
- Cobweb mold — Dissolves on contact with visible fizzing; the single best treatment for cobweb
- Surface bacteria — Effective at reducing bacterial loads on substrate surfaces and equipment
- Light surface mold — Can knock back early, superficial mold growth before it sporulates
What hydrogen peroxide does not reliably kill:
- Trichoderma — Once green spores are visible, peroxide cannot eliminate the deeply rooted mycelium
- Aspergillus — Resistant to surface treatment; spores require stronger disinfection
- Bacterial endospores — Bacillus endospores survive peroxide treatment easily
- Deep contamination — Peroxide only affects what it contacts on the surface
Important safety notes:
- Use only three percent concentration on mushroom substrate — higher concentrations can damage mycelium
- Healthy mushroom mycelium tolerates three percent hydrogen peroxide without harm
- Peroxide breaks down into water and oxygen, leaving no harmful residue
For sterilization-level disinfection, use a ten percent bleach solution or seventy percent isopropyl alcohol on equipment and surfaces. Reserve hydrogen peroxide for direct substrate applications where gentler treatment is needed.
Recurring contamination is usually a systemic problem, not a one-time event. If you clean up after a contamination outbreak but do not address the root cause, the same issue will return. Prevention requires identifying and fixing the underlying vulnerability.
Systematic prevention checklist:
- Review your sterilization protocol — Verify pressure cooker gauge accuracy, ensure full fifteen PSI for the correct duration, and check that jars or bags are not overloaded in the cooker
- Audit your clean workspace — Rebuild or re-seal your still air box, replace worn micropore tape, and ensure your work surface is properly sanitized before every session
- Inspect your spawn source — If contamination appears consistently across batches, your spawn or liquid culture may be the carrier. Test on agar before committing to grain
- Improve air quality — Add a HEPA air purifier to your growing area, seal drafty windows, and keep the room clean
- Control traffic and workflow — Minimize how often you open fruiting chambers, avoid working near open windows, and keep pets out of the grow space
Environmental improvements that make the biggest difference:
- Lower ambient temperature during colonization to slow competitor growth
- Increase spawn rates to give your mycelium a competitive advantage
- Reduce time between sterilization and inoculation
Track every batch with notes on preparation date, sterilization time, inoculation details, and outcomes. Patterns in your contamination data will reveal the weak link in your process.
No — a single contaminated jar does not mean the entire batch is lost. If one jar out of ten shows contamination, the problem is most likely specific to that jar rather than systemic. However, you need to investigate carefully before using the remaining jars.
Decision framework:
- One jar contaminated out of many — Remove the contaminated jar immediately. The remaining jars are likely fine if they show healthy white mycelium with no off smells. Monitor them closely for the next week before using
- Two to three jars contaminated — Concerning but not necessarily a batch-wide issue. Isolate remaining jars and watch carefully. Consider testing one on agar before spawning to bulk
- More than thirty percent contaminated — Indicates a systemic problem with your sterilization, inoculation technique, or spawn source. Use remaining jars with caution and investigate root cause before making more
What to check:
- Did the contaminated jars have something in common — same position in the pressure cooker, same injection port, or same syringe needle?
- Is the contamination bacterial (wet spot from grain prep issues) or mold (from sterile technique failure)?
- Were certain jars inoculated last when your SAB air had been disturbed more?
Always quarantine suspect jars away from confirmed clean ones. The cost of a few jars of grain is far less than losing a full tub of bulk substrate to contaminated spawn.
A pressure cooker itself is not a contamination source — it reaches temperatures that kill virtually all organisms during normal operation. However, cleaning it properly between uses prevents residue buildup that can affect seal integrity and sterilization performance.
Cleaning protocol after a failed batch:
- Remove and inspect the gasket — The rubber or silicone seal can harbor dried substrate and grain particles. Wash it with hot soapy water, inspect for cracks or deformation, and replace it annually or whenever it shows wear
- Clean the interior — Wash with hot water and dish soap. For stubborn residue or discoloration, fill with water and one cup of white vinegar, bring to a boil, and let it sit for thirty minutes
- Clear the vent and safety valves — Use a pipe cleaner or thin wire to ensure the steam vent, pressure regulator, and safety plug are completely clear of debris
- Inspect the gauge — If your cooker has a dial gauge, have it tested annually or compare it against a known-accurate gauge
The real question after a failed batch is why sterilization failed:
- Was the cooker at full fifteen PSI for the entire duration?
- Were jars packed too tightly, preventing steam circulation?
- Did you start timing only after full pressure was reached?
- Was there adequate water in the bottom to generate steam throughout?
If your pressure cooker is functioning correctly, no special decontamination is needed — the next sterilization cycle will kill anything present. Focus your troubleshooting on process errors rather than equipment contamination.
Need more help? Dr. Myco can answer follow-up questions about rescue & recovery techniques based on thousands of real growing experiences.
Ask Dr. Myco