Identifying Contamination
11 tips in Contamination & Troubleshooting
By Andrew Langevin · Founder, Nature Lion Inc · Contributing author, Mushroomology (Brill, 2026)
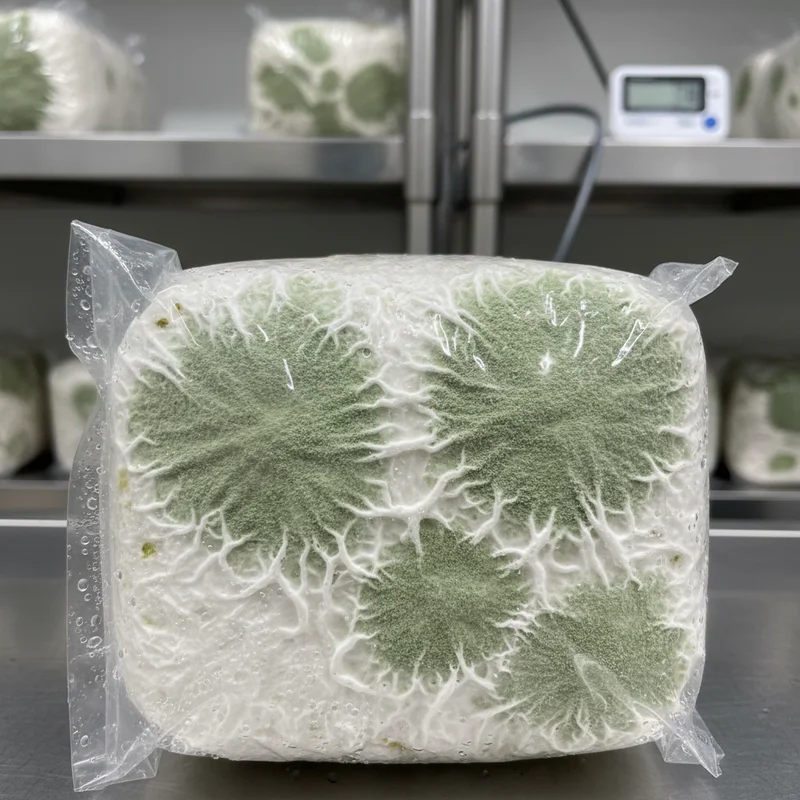
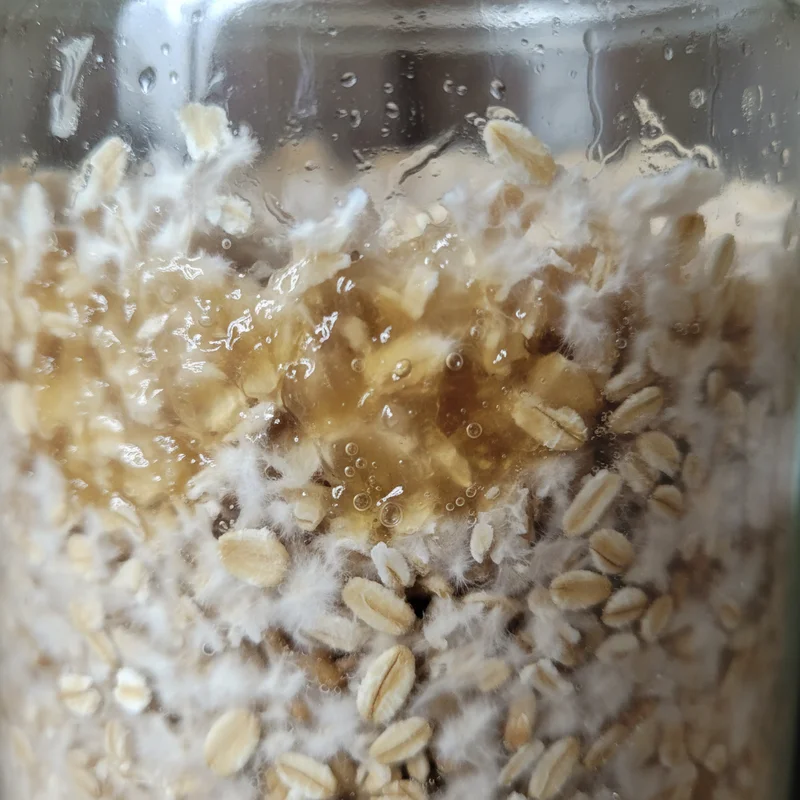
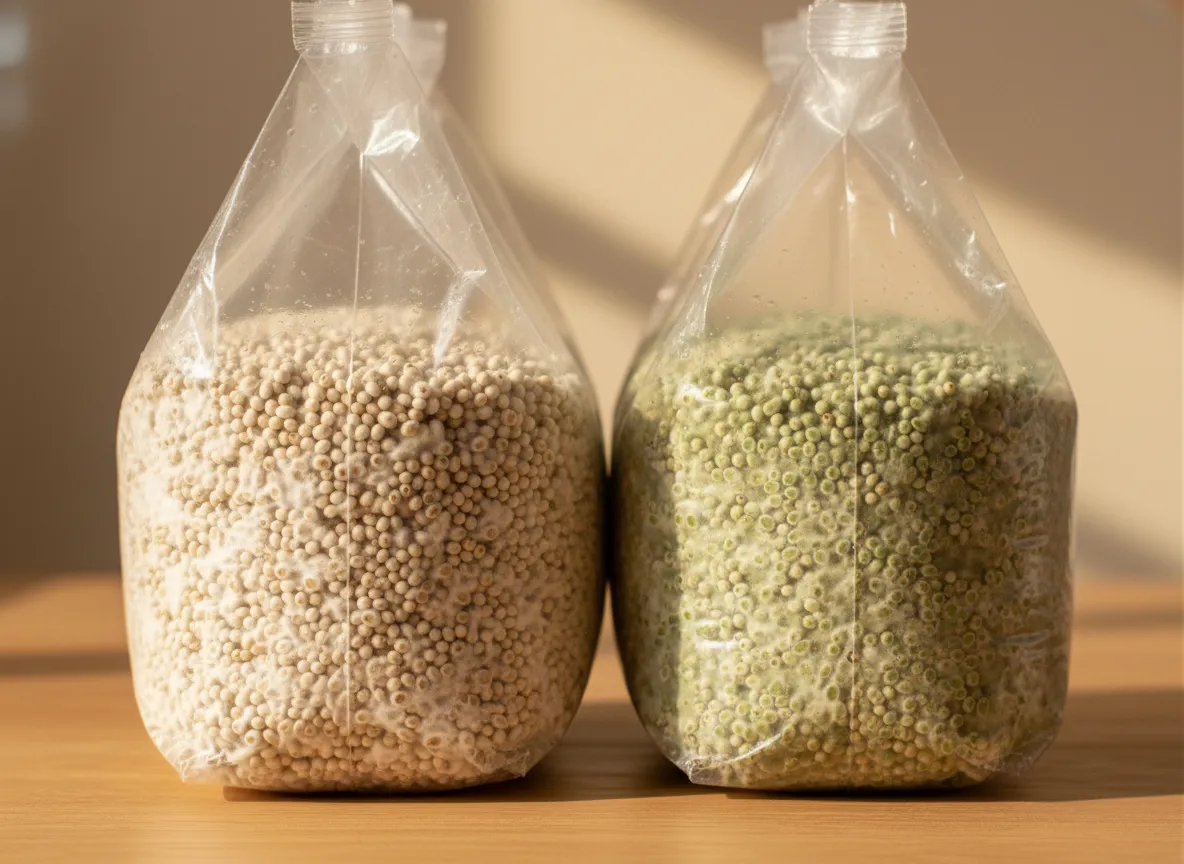
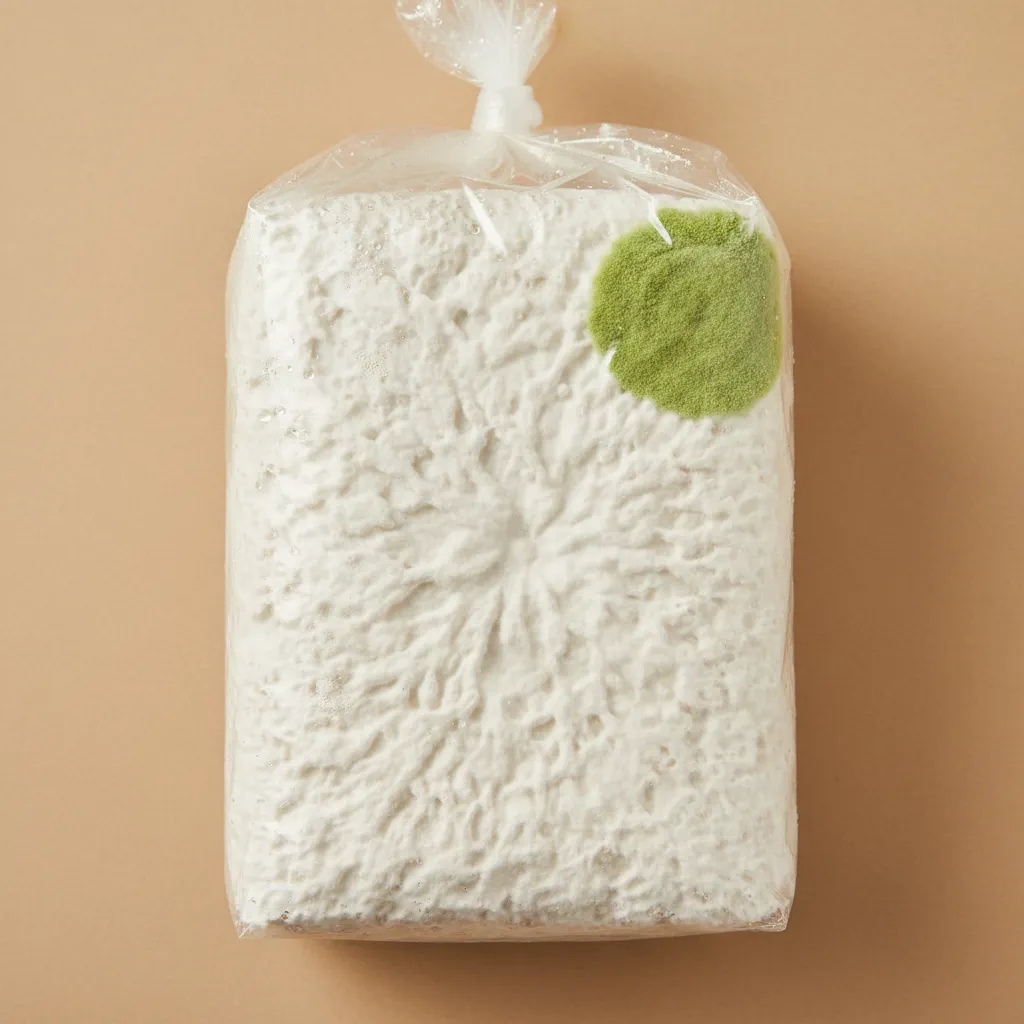
Trichoderma is the single most common contaminant in mushroom cultivation and the one you need to recognize instantly. It starts as a patch of bright white mycelium that is noticeably more aggressive-looking than your mushroom culture — it grows fast and thick. Within 24 to 48 hours those white patches turn green, starting from the center outward. The green can range from forest green to almost neon, depending on the species.
Once you see green, the battle is already lost for that container. Trichoderma produces billions of spores that spread on the slightest air current, so the moment you spot it you should seal that container and remove it from your growing space immediately. Do not open it indoors.
Trichoderma thrives on improperly sterilized grain and substrate, and it loves warm, humid environments — exactly the same conditions your mushrooms prefer. If you are seeing Trichoderma repeatedly, your sterilization protocol needs a complete overhaul:
- Check your pressure cooker gauge for accuracy
- Extend your sterilization time
- Verify your spawn is clean before use
- Ensure one contaminated jar in a still air box does not ruin an entire batch
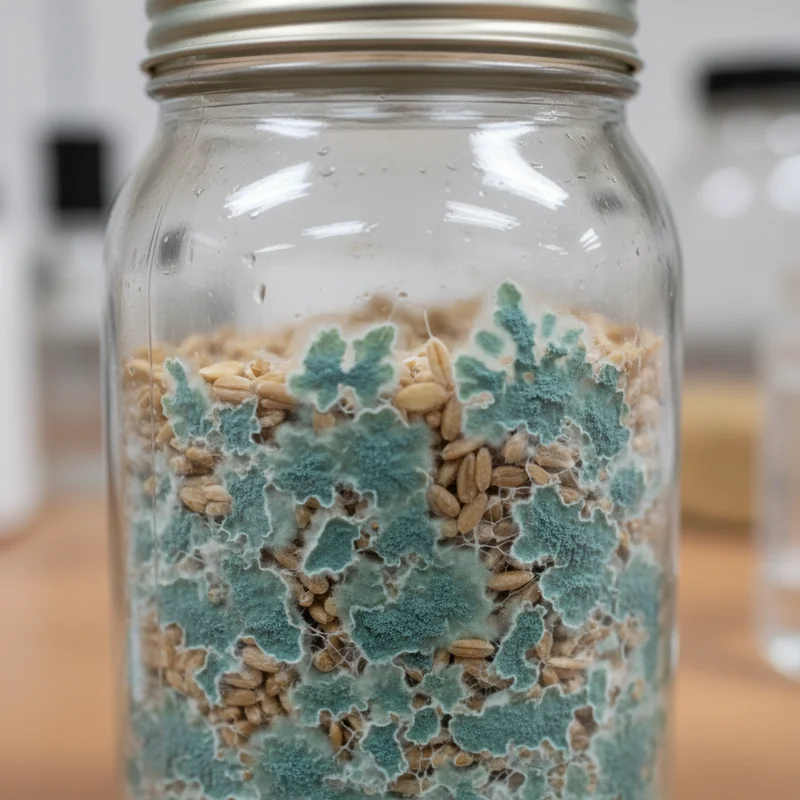
Penicillium appears as dusty, powdery patches of blue-green to teal color on your grain or substrate. Unlike Trichoderma, which starts white and turns green, Penicillium often shows color almost immediately and has a distinctly powdery, flour-like texture on the surface. If you tilt the jar, you might see spores dust off the colony — that powdery quality is your key identifier.
Penicillium is the same genus that grows on old bread and citrus fruits, so it looks very familiar. It typically enters through filter failures or contaminated grain that was not fully sterilized. On agar, Penicillium forms neat circular colonies with concentric rings of color, making it easier to distinguish from mushroom mycelium.
While not as aggressively competitive as Trichoderma in many cases, Penicillium still means that jar or bag is done. Discard it sealed. The spores are everywhere in our environment, so its presence in your culture usually points to:
- A break in sterile technique
- Insufficient sterilization time
- Increase your pressure cooking time by 15 minutes if you see this regularly
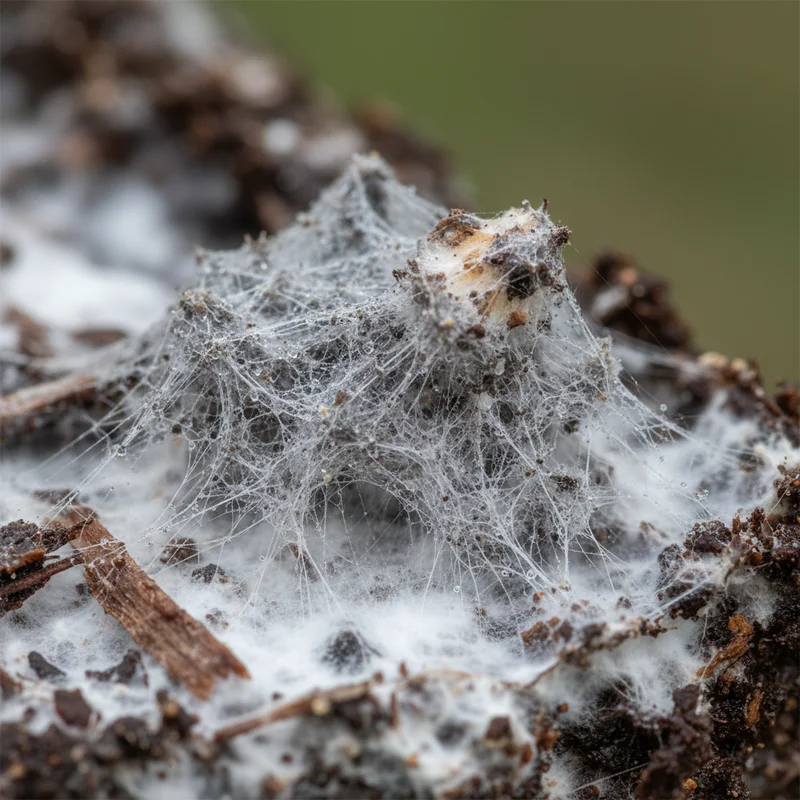
Cobweb mold (Dactylium myleogone) is wispy, gray, and grows incredibly fast — it can cover an entire fruiting block surface overnight. That speed is your first clue. Healthy mushroom mycelium does not expand inches in a single day during fruiting. Cobweb mold looks exactly like its name: thin, airy strands that float above the substrate surface rather than gripping into it, with a grayish tint compared to the bright white of most mushroom mycelium.
Cobweb mold is one of the only contaminants you can actually treat. A direct spray of 3% hydrogen peroxide will kill cobweb mold on contact — the peroxide fizzes and the mold collapses within seconds. Healthy mushroom mycelium is not harmed by 3% hydrogen peroxide.
To address cobweb mold:
- Spray the affected area thoroughly with 3% hydrogen peroxide
- Improve your fresh air exchange to reduce stagnant humid conditions
- Monitor closely over the next 48 hours
- If it comes back, spray again
Most growers who catch cobweb early can save the flush. However, if you are seeing it on every block, your fruiting room needs better air circulation and possibly lower humidity.
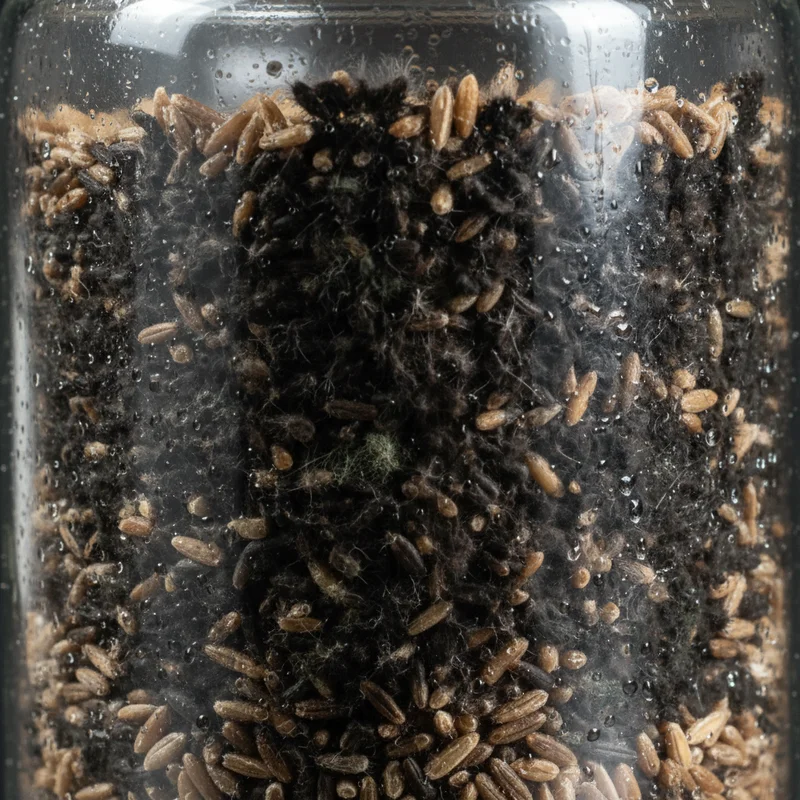
Aspergillus niger appears as dark brown to jet-black powdery patches on your grain, substrate, or agar. It often starts as a small dark spot and expands into a circular colony with a dense, sooty texture. Some Aspergillus species start yellow or brown before darkening. This is the contaminant you should take most seriously from a health perspective — Aspergillus produces mycotoxins and its spores can cause aspergillosis, a serious respiratory infection, particularly dangerous for immunocompromised individuals.
If you find black mold, follow these safety steps:
- Do not open the container inside your home or growing space
- Seal it in a plastic bag and dispose of it in outdoor trash
- Do not try to save adjacent jars without careful inspection
- If you see it on agar, seal the plate with parafilm and discard it
- Always wear an N95 respirator when handling any suspected Aspergillus contamination
Black mold in your grow space usually indicates contaminated substrate, grains that were too wet before sterilization, or poor air filtration. Review your moisture content — grain should have no visible surface moisture after soaking and simmering.

Lipstick mold is unmistakable: it produces bright pink to reddish-orange patches that look like someone smeared lipstick across your grain or substrate. It typically shows up on grain spawn rather than bulk substrate, and it appears relatively early in colonization. The color starts as a pale pink dot and intensifies to a vivid coral or red as the colony matures.
Lipstick mold is not as aggressively competitive as Trichoderma — it tends to sit in its patch rather than racing across the jar — but it still means that container is contaminated and should be discarded. The color alone makes it impossible to confuse with any mushroom mycelium.
Lipstick mold spores are heat-resistant, which is why it sometimes survives sterilization cycles that kill everything else. If you are seeing lipstick mold repeatedly, it almost certainly means your sterilization pressure or time is insufficient:
- Make sure your pressure cooker is reaching a full 15 PSI and holding there for the complete duration
- Check that your jars are not packed too tightly in the cooker, which can create cold spots where temperatures never reach the sterilization threshold
Bacterial contamination — commonly called wet spot or sour rot — shows up as slimy, wet-looking grain kernels that appear darker and more translucent than the surrounding healthy grain. The affected grains look water-logged and glassy. As it progresses, you will see a grayish, slimy film connecting grain kernels, and the jar may develop a slightly cloudy appearance in the gaps between grains.
The smell is the giveaway: crack the lid slightly and you will get a hit of sour, acidic odor like rotting food or vinegar. Bacillus species are the most common cause, and their endospores are extremely heat-resistant.
Bacterial contamination almost always comes from grain that was too wet going into the pressure cooker, or from insufficient sterilization time. To prevent it:
- Your grain should be properly hydrated but dry on the surface
- The shake test should produce grains that separate freely, not clump together
- If more than about 10% of your jars show wet spot, reduce soak time or increase your post-simmer drying period
Pink or reddish discoloration in liquid culture is a strong indicator of bacterial contamination, most commonly from Serratia marcescens or pink yeast (Rhodotorula). If your liquid culture develops a pink, salmon, or reddish tint — either throughout the broth or concentrated at the bottom — consider it contaminated. Healthy liquid culture should be a clear to slightly cloudy broth with white mycelial clumps swirling when you agitate it.
Pink contamination can show up in several ways:
- A pink ring at the waterline
- A pinkish sediment layer at the bottom
- A diffuse pink or salmon tint throughout the broth
No common culinary or medicinal mushroom species produce pink-colored growth in liquid media, so do not confuse this with normal mycelium characteristics.
The usual cause is a compromised filter, a tiny leak in the injection port, or contaminated syringes and needles. To prevent it:
- Always flame-sterilize your needle until it glows red before every injection
- Let the needle cool for a few seconds before inserting into the port
- Use at least two layers of micropore tape or a proper synthetic filter disc on your LC lids
- Sterilize at 15 PSI for at least 20 minutes and allow it to cool fully before inoculating
The Q-tip test is a simple way to distinguish between mold spores and discoloration or bruising on your substrate or casing layer. Take a clean cotton swab and gently press and roll it against the suspicious area. If the color transfers onto the cotton — you see green, black, blue, or other pigment on the Q-tip — it is mold spores and you have contamination. If nothing transfers and the Q-tip comes away clean, you are likely looking at bruising, metabolites, or natural discoloration, which are usually harmless.
This test works because mold spores sit loosely on top of surfaces and transfer easily, while bruising is a chemical reaction within the mycelium tissue itself that does not rub off.
The Q-tip test is most useful for:
- Distinguishing Trichoderma green from mushroom bruising, which can both appear blue-green
- Identifying dark spots that could be either Aspergillus spores or simply wet, dark substrate showing through thin mycelium
Keep in mind that this test only works once spores have formed — very early mold infections that are still in the white mycelial stage will not produce a positive Q-tip result. Use it as one diagnostic tool among several.
If you see small mushrooms growing in your substrate that do not look like what you inoculated with, you have a contamination issue — but an unusual one. The most common uninvited fruiting bodies are inky caps (Coprinellus species), which appear as tiny, delicate mushrooms with grayish caps that quickly blacken and dissolve into an inky mess. They thrive on composted or pasteurized straw and manure substrates.
You may also encounter small white or brown pin-like mushrooms from various wild species whose spores survived your pasteurization process. While these contaminant mushrooms are not necessarily dangerous to your target culture the way Trichoderma is, their mycelium is competing with your target species for nutrients.
Contaminant mushrooms in your substrate usually indicate:
- Pasteurization temperature was too low or hold time was too short
- Compost was not fully finished or was recontaminated during spawning
Remove the contaminant fruiting bodies and let your target mycelium continue colonizing. The block may still produce, but expect reduced yields. Do not eat any mushroom you did not intentionally grow and cannot positively identify.
There are four reliable indicators of contamination that you should check daily: color, smell, speed, and texture. Any color other than white on your colonizing substrate is suspicious — green, black, pink, orange, and blue all warrant immediate investigation. The exception is yellow metabolite droplets, which are normal.
Here is what to look for with each indicator:
- Color — Green, black, pink, orange, or blue patches warrant immediate investigation
- Smell — Healthy mycelium smells clean, earthy, and pleasantly mushroomy; sour, sweet, chemical, or rotten smells indicate contamination
- Speed — If one section colonizes dramatically faster than the rest, that aggressive growth might be a contaminant rather than your mushroom culture
- Texture — Slimy, wet, or oozing areas suggest bacterial contamination; powdery or dusty patches suggest mold sporulation
When in doubt, isolate the questionable container from your healthy ones and monitor it for another 24 to 48 hours. Contamination usually becomes obvious very quickly once it starts. Taking a few photos each day helps you track subtle changes that are hard to notice in real time.
The false chanterelle (Hygrophoropsis aurantiaca) closely mimics the prized golden chanterelle (Cantharellus cibarius) in color and general shape, but several key features distinguish them. Eating false chanterelles causes gastrointestinal distress in many people, so accurate identification matters.
How to tell them apart:
- Gills vs ridges — this is the most reliable feature. False chanterelles have thin, crowded, true gills that are blade-like, forking, and easily separated from the cap with a fingernail. Real chanterelles have blunt, shallow, forking ridges (false gills) that flow smoothly down the stem and cannot be cleanly separated from the cap flesh
- Gill attachment — false chanterelle gills are decurrent (running down the stem) but remain distinctly separate structures. Chanterelle ridges merge seamlessly into the stem surface
- Cap texture — false chanterelles have a dry, slightly fuzzy or velvety cap surface, often with faint concentric zones of color. Real chanterelles have a smooth, waxy cap
- Color — false chanterelles tend toward deeper orange to brownish-orange, sometimes with darker center zones. Golden chanterelles are a more uniform egg-yolk yellow to golden
- Flesh color — cut the mushroom in half. Chanterelle flesh is pale white to cream throughout. False chanterelle flesh is orange-tinted through the cap
- Spore print — chanterelles produce a white to pale yellow spore print. False chanterelles produce an orange to orangish-white print
Habitat differences:
- False chanterelles grow on decaying wood, wood chips, pine duff, and sawdust — they are saprobic (decomposers)
- True chanterelles grow on the ground in association with living trees — they are mycorrhizal and never grow directly on wood
When in doubt, the gill test is definitive. Run your finger across the underside: if you feel thin, blade-like gills that wobble independently, it is a false chanterelle. If you feel smooth, rounded, interconnected ridges, it is likely a true chanterelle.
Need more help? Dr. Myco can answer follow-up questions about identifying contamination based on thousands of real growing experiences.
Ask Dr. Myco